


Table of Contents
Halloween is over, the trick-or-treaters have come and gone, and you’re left with a mountain of leftover candy. Sure, you could eat it piece by piece over the next few months, or you could transform it into something truly spectacular: Spooky Halloween Trash Can Cookies. These monster-sized, loaded-with-everything cookies are the perfect solution for your candy surplus, and they’re so delicious that you might find yourself buying extra candy just to make them.
Thank you for reading this post, don't forget to subscribe!
Inspired by the viral “kitchen sink” or “trash can” cookie trend that’s been taking over TikTok and Instagram, this recipe embraces the philosophy that more is more. We’re talking about a buttery, soft cookie base packed with chopped candy bars, crunchy pretzels, chocolate chips, and whatever else your heart desires. The result is a cookie that’s different in every bite—a delightful surprise of textures and flavors that keeps you coming back for more.
What makes this recipe truly special is its flexibility. There are no strict rules about what goes in these cookies. Got a bag of mini Snickers? Throw them in. Leftover Reese’s Peanut Butter Cups? Perfect. A handful of M&M’s, some crushed potato chips, and a few candy corn? Why not! The beauty of trash can cookies is that they’re completely customizable based on what you have on hand.
This is also a fantastic recipe to make with kids. They’ll love helping to unwrap and chop the candy, mixing the dough, and seeing their favorite Halloween treats transformed into cookies. It’s a fun weekend baking project that turns candy cleanup into a creative adventure.
Print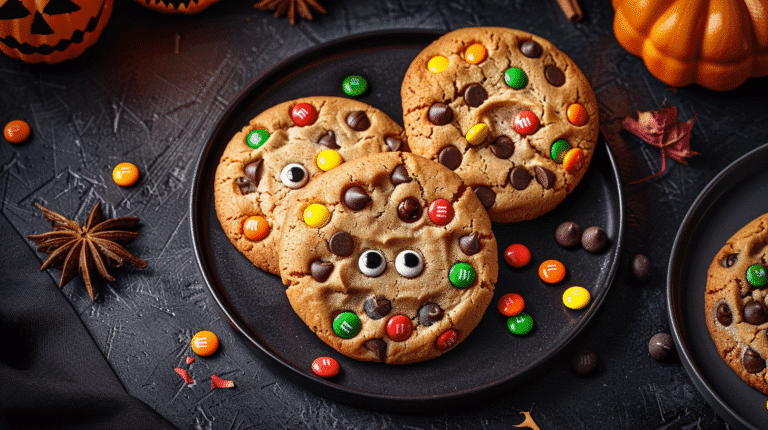
Spooky Halloween Trash Can Cookies: The Most Fun Way to Use Up All That Leftover Candy!
Transform leftover Halloween candy into amazing trash can cookies! Loaded with chocolate, pretzels, and candy, these spooky cookies are a fun recipe the whole family will love. Soft, chewy, and packed with sweet-salty flavor — so easy and fun to make!
- Total Time: 32 minutes
- Yield: 24 large cookies 1x
Ingredients
For the Cookie Dough:
-
1 teaspoon baking soda
-
½ teaspoon salt
-
1 cup (2 sticks) unsalted butter, softened
-
¾ cup granulated sugar
-
¾ cup packed brown sugar
-
2 large eggs, room temperature
-
1 teaspoon vanilla extract
2¼ cups all-purpose flour
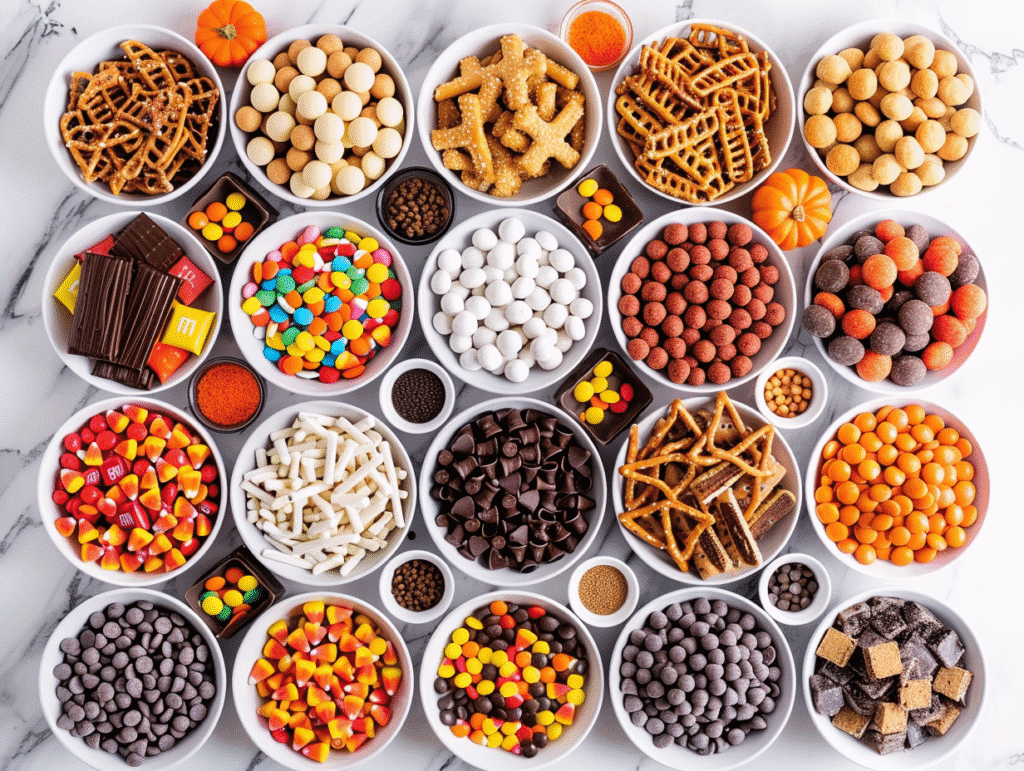
The “Trash” Mix-Ins (2–3 cups total):
-
½ cup M&Ms (regular or peanut)
-
½ cup crushed pretzels or potato chips
-
½ cup chocolate chips (optional but recommended)
-
¼ cup chopped nuts (optional)
-
Candy eyeballs for decoration (optional but fun!)
1 cup chopped Halloween candy (Snickers, Reese’s, Kit Kat, Twix, etc.)
Instructions
Step 1: Prep Mix-Ins
Unwrap and chop all candy into bite-sized pieces. Crush pretzels or chips into small chunks. Mix everything in a medium bowl.
Step 2: Prepare Oven
Preheat to 375°F (190°C). Line two baking sheets with parchment paper or silicone mats.
Step 3: Mix Dry Ingredients
In a bowl, whisk flour, baking soda, and salt together.
Step 4: Cream Butter & Sugar
Beat softened butter with both sugars until light and fluffy (2–3 minutes).
Step 5: Add Eggs & Vanilla
Beat in eggs one at a time, then vanilla. Mix until combined.
Step 6: Combine Wet & Dry Mixtures
Slowly add dry ingredients into the butter mixture. Mix just until combined — do not overmix.
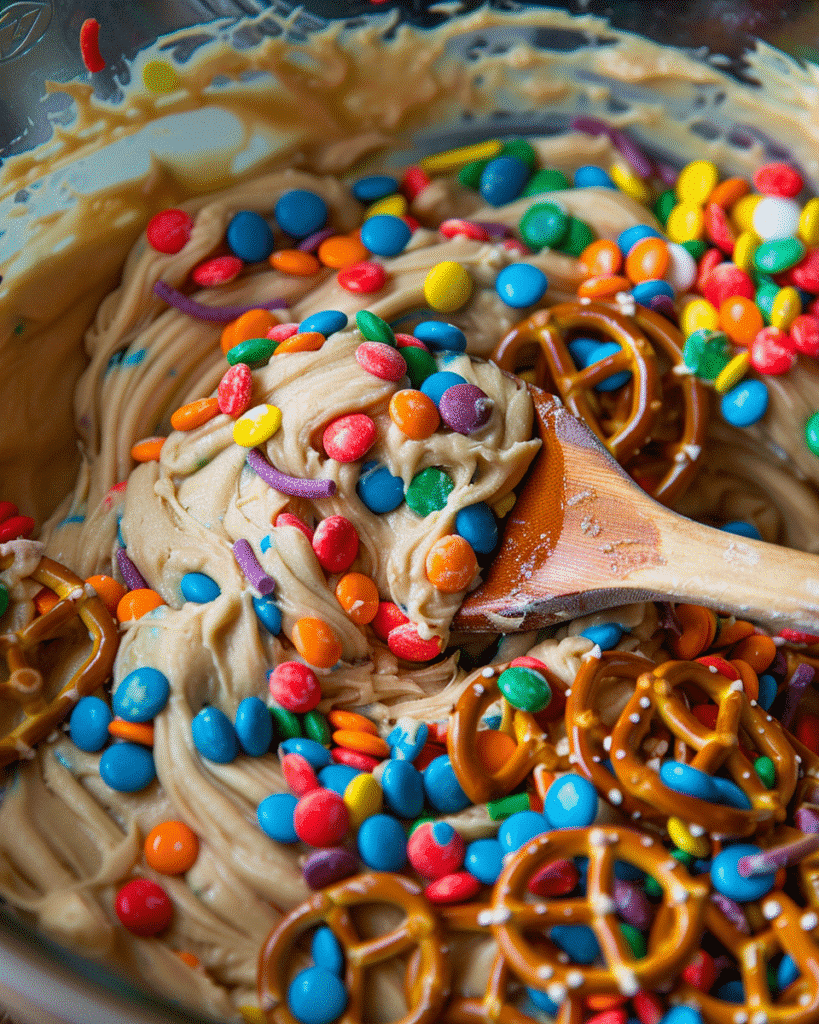
Step 7: Add the “Trash”
Fold in all your mix-ins until evenly distributed.
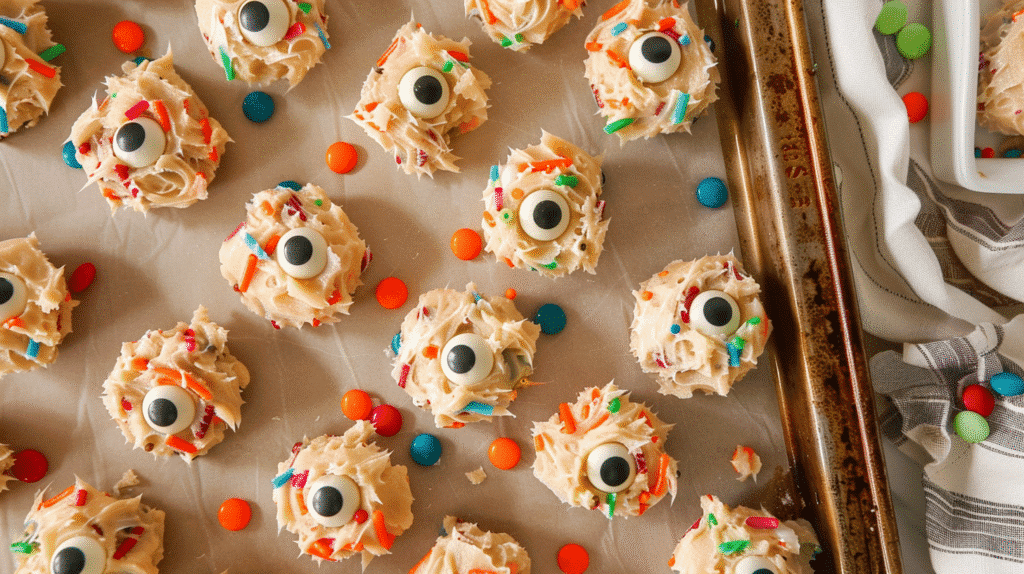
Step 8: Scoop & Decorate
Scoop large balls (2–3 tbsp each) onto sheets. Press candy eyeballs or extra M&Ms on top.
Step 9: Bake
Bake for 10–12 minutes until edges are golden but centers are slightly soft.
Step 10: Cool
Cool on baking sheet for 5 minutes before transferring to a rack.
Notes
💡 Pro Tips
Chill the dough for 30–60 mins for thicker cookies.
Balance your mix-ins: chocolate, caramel, and something salty.
Press a few extra candies on top right after baking for a bakery-style look.
🍬 Variations
Peanut Butter Trash Cookies: Add ½ cup peanut butter.
Monster Cookies: Add oats and peanut butter M&Ms.
S’mores Style: Add graham crackers and mini marshmallows.
Gluten-Free: Use 1:1 gluten-free flour blend.
🧊 Storage
Room temp: 5 days in airtight container.
Freezer: Up to 3 months (baked or dough balls).
Reheat: Microwave 10 seconds for gooey texture.
- Prep Time: 20 minutes
- Cook Time: 12 minutes
- Category: Dessert, Cookies
- Method: Baked
- Cuisine: American Comfort Food
Nutrition
- Serving Size: 245 per cookie
- Calories: 245 per cookie
- Sugar: 11g
- Sodium: 6g
- Fat: 30mg
- Saturated Fat: 150mg
- Unsaturated Fat: 35g
- Trans Fat: 1g
- Carbohydrates: 24g
- Fiber: 1g
- Protein: 3g
Keywords: halloween trash can cookies, leftover candy cookies, loaded cookies
After all, nothing brings out the spirit of Halloween like Halloween trash can cookies!
As you mix in the candy, imagine the excitement of making Halloween trash can cookies together with family.
These Halloween trash can cookies are a fun way to celebrate the season and reduce candy waste.
With Halloween trash can cookies, your creativity knows no bounds!
The Story Behind Trash Can Cookies
These Spooky Halloween Trash Can Cookies are the ultimate way to use up your leftover Halloween candy. Imagine the delight of biting into these delicious, loaded cookies that celebrate the season with every scrumptious bite of Halloween Trash Can Cookies!
These sugary delights, known as Halloween trash can cookies, are bound to impress!
As you prepare these Halloween trash can cookies, keep the fun and creativity flowing.
The more candy, the better the Halloween trash can cookies turn out!
Have fun making your own version of Halloween trash can cookies!
The concept of “kitchen sink cookies”—cookies that contain a little bit of everything—has been around for decades. But the modern “trash can cookie” trend really took off on social media in recent years, with bakers competing to see who could create the most loaded, over-the-top cookie possible.
What better way to enjoy your Halloween candy than in a batch of Halloween trash can cookies?
The name might sound unappealing, but it’s actually a playful reference to the idea of throwing everything but the kitchen sink (or in this case, everything from your candy bowl) into the dough. These cookies celebrate abundance, creativity, and the joy of mixing unexpected flavors and textures.
Making Halloween Trash Can Cookies is a creative way to get the family involved in the kitchen! Each kid can choose their favorite candies to include in these Halloween Trash Can Cookies, making it a fun project for everyone.
Why You’ll Love Halloween Trash Can Cookies
As the holiday approaches, think of the joy that Halloween trash can cookies will bring!
Embrace the spirit of Halloween with your homemade Halloween trash can cookies!
These treats, known as Halloween trash can cookies, are sure to delight everyone!
Your Halloween trash can cookies will be the highlight of any gathering!
Let your imagination run wild with Halloween trash can cookies and create a spooky masterpiece!
When baking, remember that Halloween trash can cookies are all about fun!
During Halloween season, trash can cookies take on a special significance. They’re the perfect way to use up all that candy that would otherwise sit in your pantry for months. They’re also a great alternative to simply eating candy straight from the bag—at least with these cookies, you’re getting some homemade goodness along with your sugar rush!
Why You’ll Love This Recipe
Uses Up Leftover Candy: Finally, a delicious and creative solution for that overflowing candy bowl. No more guilt about wasting candy or eating it all yourself.
When it comes to Halloween treats, nothing beats the fun of Halloween Trash Can Cookies! They are not only delicious but also customizable for every taste preference.
Completely Customizable: This is a no-rules recipe. Use whatever candy and mix-ins you have on hand. Every batch can be different.
Perfect Salty-Sweet Balance: The combination of sweet chocolate and caramel with salty pretzels or chips creates an irresistible flavor profile.
Fun for the Whole Family: Kids love helping with this recipe, from unwrapping candy to mixing the dough.
Impressive Results: These cookies look and taste like they came from a gourmet bakery, but they’re incredibly easy to make.
Great for Sharing: These cookies are conversation starters. Bring them to a party or potluck and watch them disappear.
Understanding Your Ingredients
These Halloween Trash Can Cookies are perfect for parties, bake sales, or just a fun treat at home. Make sure to save some for yourself!
The Cookie Base
The foundation of trash can cookies is a classic chocolate chip cookie dough. It’s sturdy enough to hold all those mix-ins without falling apart, and the buttery, slightly sweet flavor provides the perfect backdrop for all the candy.
All-Purpose Flour: This provides structure. The gluten in the flour gives the cookies their chewy texture.
Baking Soda: This leavening agent helps the cookies rise and creates a tender crumb.
Salt: Essential for balancing the sweetness and enhancing all the other flavors.
Butter: Use unsalted butter so you can control the salt level. The butter should be softened to room temperature—soft enough to leave an indent when pressed, but not melted or greasy.
Granulated and Brown Sugar: Using both types of sugar creates the perfect texture. Granulated sugar helps the cookies spread and crisp up, while brown sugar (which contains molasses) adds moisture and chewiness.
Eggs: These bind everything together and add richness. Room temperature eggs incorporate more easily into the dough.
Vanilla Extract: Pure vanilla extract adds depth and rounds out the flavors.
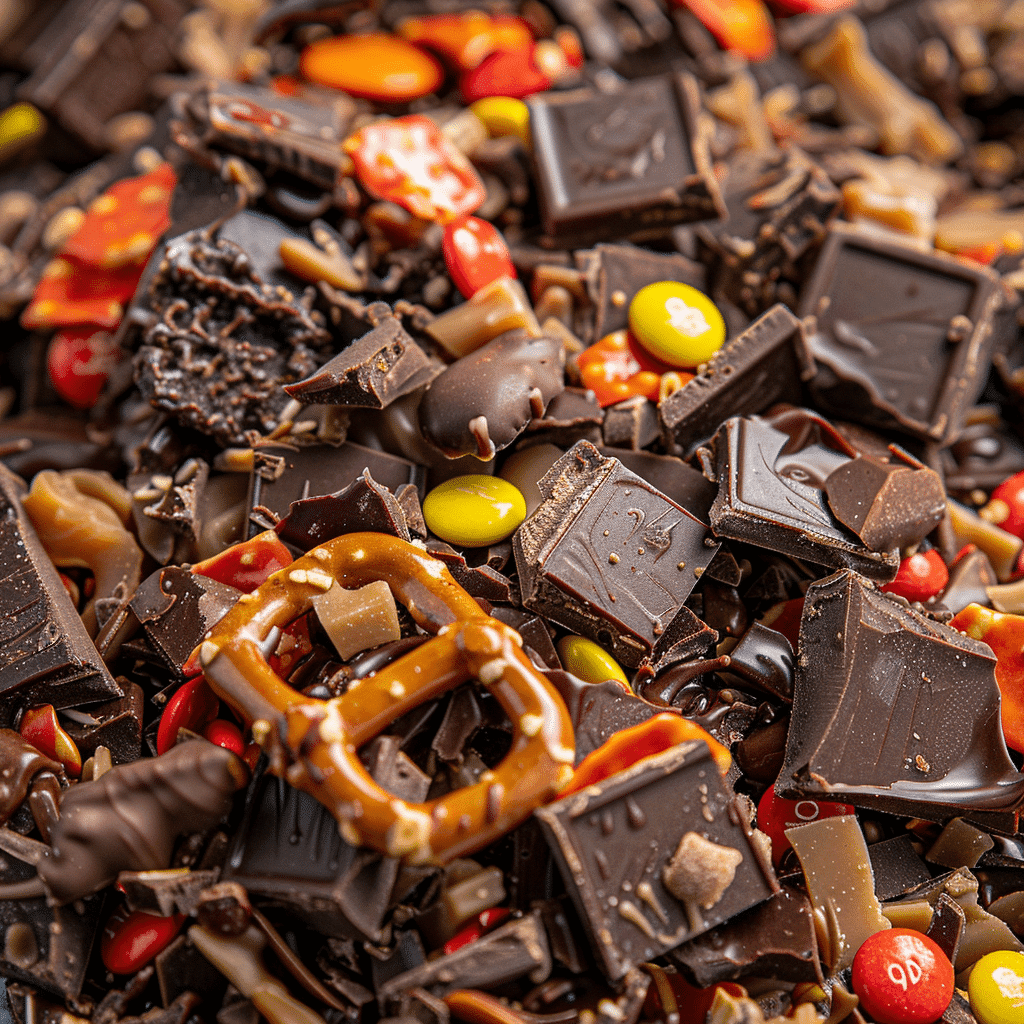
The “Trash” Mix-Ins
This is where the fun begins! Here’s a guide to choosing your mix-ins:
Chocolate-Based Candy: Snickers, Milky Way, Twix, Kit Kats, Reese’s Peanut Butter Cups, and M&M’s all work beautifully. Chop the larger bars into bite-sized pieces.
Caramel Candy: Rolos, Milk Duds, and caramel squares add gooey pockets of sweetness.
Salty Elements: Crushed pretzels or potato chips provide crucial textural contrast and balance out the sweetness.
Chocolate Chips: While not strictly necessary (you’re already adding candy!), extra chocolate chips never hurt.
Nuts: Chopped peanuts, pecans, or walnuts add crunch and richness.
Fun Additions: Candy eyeballs for a spooky touch, Halloween sprinkles, or even crushed Oreos.
The key is to aim for about 2-3 cups of total mix-ins. You want enough to make the cookies interesting without overwhelming the dough.
Ingredients
For the Cookie Dough:
•2 ¼ cups All-Purpose Flour
•1 teaspoon Baking Soda
•½ teaspoon Salt
•1 cup (2 sticks) Unsalted Butter, softened to room temperature
•¾ cup Granulated Sugar
•¾ cup packed Brown Sugar
•2 large Eggs, at room temperature
•1 teaspoon Vanilla Extract
The “Trash” Mix-Ins (About 2-3 cups total):
•1 cup Chopped Halloween Candy (Snickers, Reese’s, Kit Kats, Twix, etc.)
•½ cup M&M’s (regular or peanut)
•½ cup Crushed Pretzels or Potato Chips
•½ cup Chocolate Chips (optional but recommended)
•¼ cup Chopped Nuts (optional)
•Candy Eyeballs for decoration (optional but fun!)
Equipment You’ll Need
•Two large baking sheets
•Parchment paper or silicone baking mats
•Mixing bowls (one large, one medium)
•Electric mixer (hand mixer or stand mixer)
•Measuring cups and spoons
•Rubber spatula
•Cookie scoop or spoon
•Wire cooling rack
Step-by-Step Instructions
Preparing Your Mix-Ins
Step 1: Unwrap and Chop Candy This is a great job for kids! Unwrap all your candy bars and roughly chop them into bite-sized pieces. You don’t need to be too precise—a variety of sizes actually adds to the charm of these cookies.
Step 2: Crush Pretzels or Chips Place your pretzels or potato chips in a zip-top bag and crush them with your hands or a rolling pin. You want pieces, not powder, so don’t crush them too finely.
Step 3: Combine Mix-Ins In a medium bowl, toss together all your chopped candy, M&M’s, crushed pretzels, chocolate chips, and any other mix-ins you’re using. This makes it easier to fold them evenly into the dough later.
Making the Cookie Dough
Step 1: Preheat Your Oven Preheat your oven to 375°F (190°C). Position racks in the upper and lower thirds of the oven for even baking.
Step 2: Prepare Baking Sheets Line two large baking sheets with parchment paper or silicone baking mats. This prevents sticking and makes cleanup easier.
Have a spooky good time with these delicious Halloween trash can cookies!
Step 3: Combine Dry Ingredients In a medium bowl, whisk together the flour, baking soda, and salt. Set aside.
Step 4: Cream Butter and Sugars In a large bowl, using an electric mixer on medium-high speed, beat the softened butter with both sugars for 2-3 minutes. The mixture should become light, fluffy, and pale in color. This creaming process incorporates air, which helps create a tender cookie.
Step 5: Add Eggs and Vanilla Beat in the eggs one at a time, mixing well after each addition. Then add the vanilla extract and mix until combined. The mixture might look slightly curdled at this point—that’s completely normal.
Step 6: Add Dry Ingredients With the mixer on low speed, gradually add the flour mixture to the wet ingredients. Mix until just combined—you should see no streaks of flour, but don’t overmix. Overmixing develops too much gluten, resulting in tough cookies.
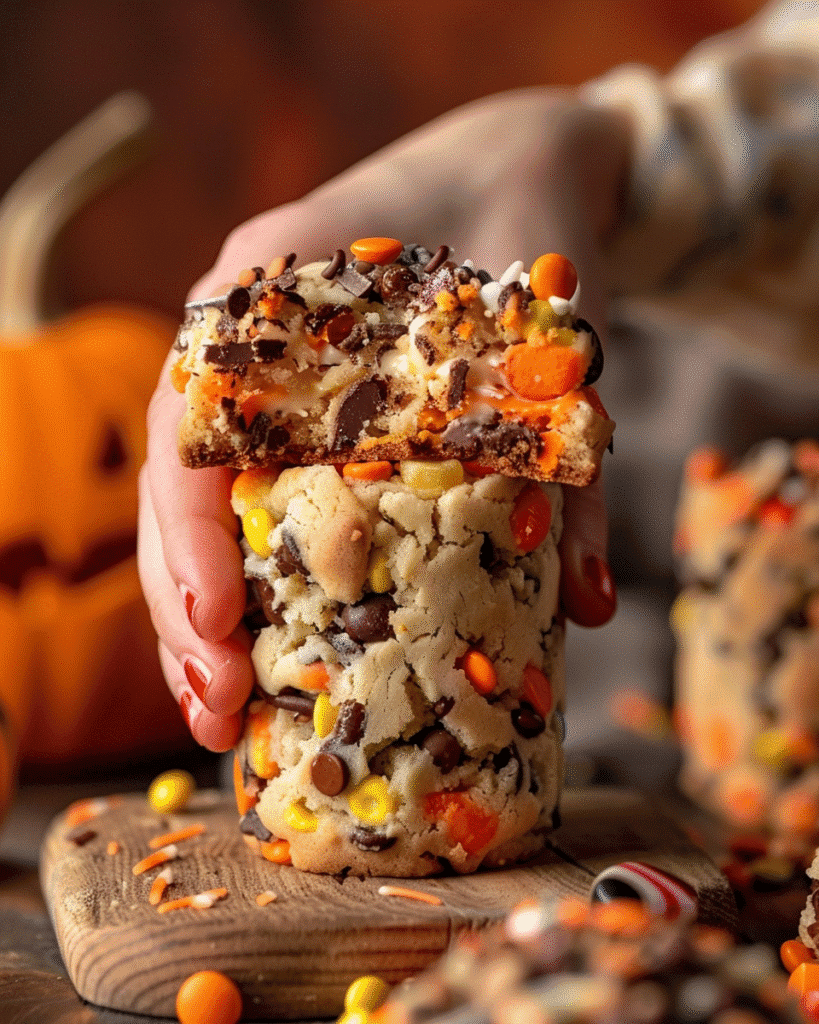
Step 7: Fold in the “Trash” Using a rubber spatula or wooden spoon, gently fold in all your mix-ins. Make sure they’re evenly distributed throughout the dough. The dough will be quite thick and loaded with goodies—that’s exactly what you want!
Step 8: Scoop the Dough Using a cookie scoop or a spoon, drop large mounds of dough (about 2-3 tablespoons each) onto your prepared baking sheets. Space them about 3 inches apart to allow for spreading. If you’re using candy eyeballs, press a few onto the top of each cookie dough ball now.
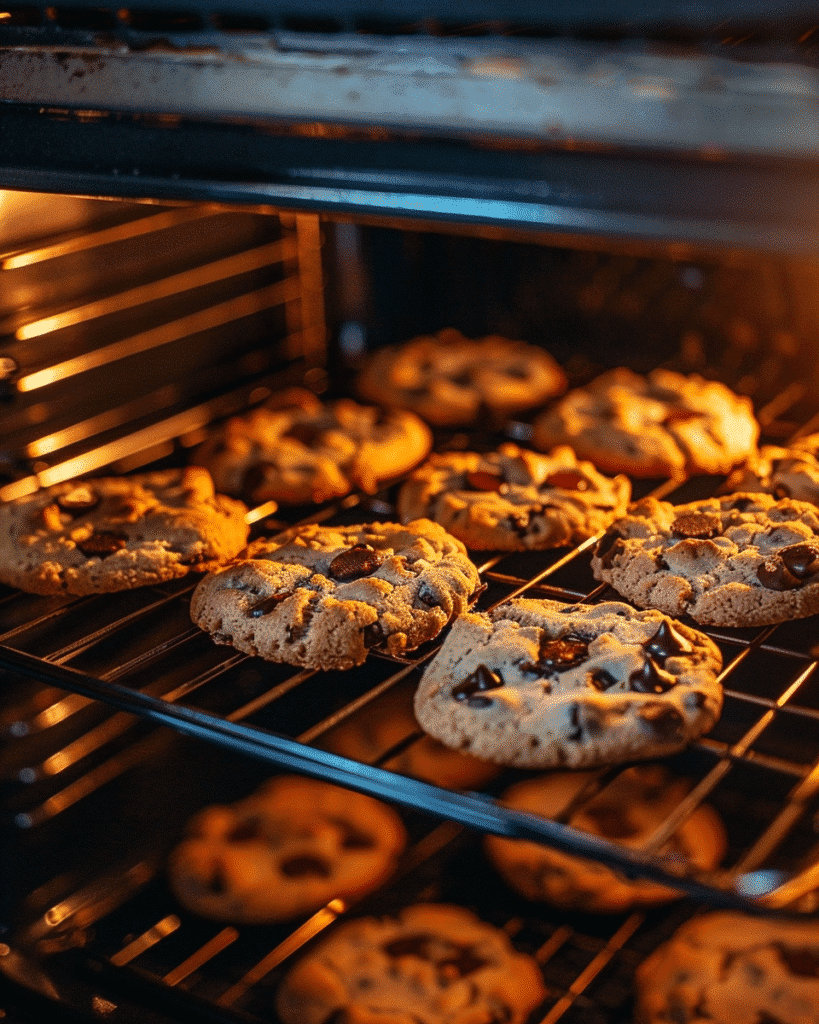
Step 9: Bake Bake for 10-12 minutes, rotating the pans halfway through for even baking. The cookies are done when the edges are golden brown and set, but the centers still look slightly underdone. They’ll continue to cook on the hot baking sheet after you remove them from the oven.
Step 10: Cool Let the cookies cool on the baking sheet for 5 minutes. This allows them to set up and makes them easier to transfer. Then, use a spatula to move them to a wire rack to cool completely.
With Halloween Trash Can Cookies, you can enjoy a delightful mix of flavors that highlight your favorite candies, making each bite an adventure!
Pro-Tips for Perfect Trash Can Cookies
Chill the Dough for Thicker Cookies: If you prefer cookies that are thick and chewy rather than thin and crispy, refrigerate the dough for 30 minutes to 1 hour before baking. Cold dough spreads less in the oven.
Balance Your Mix-Ins: Try to include a mix of textures and flavors. Aim for some chocolate, some caramel, something crunchy, and something salty.
Don’t Overbake: These cookies are best when they’re soft and chewy in the center. Take them out when the edges are set but the middle still looks a bit underdone.
Press Extra Goodies on Top: Before baking, press a few extra candy pieces or M&M’s onto the top of each cookie for a more impressive presentation.
Make Them Extra Large: For truly impressive cookies, use a ¼ cup measure to scoop the dough. Bake for 14-16 minutes.
Gather your ingredients and make some Halloween trash can cookies today!
Save Some Mix-Ins: Reserve a handful of your prettiest candy pieces and press them into the tops of the cookies right after they come out of the oven for a professional bakery look.
Delicious Variations
Peanut Butter Trash Cookies: Add ½ cup of peanut butter to the dough and use Reese’s, peanut butter cups, and chopped peanuts as your main mix-ins.
These Halloween trash can cookies will be the talk of the town!
Monster Cookie Version: Add ½ cup of rolled oats to the dry ingredients and use peanut butter M&M’s and chocolate chips.
White Chocolate Trash Cookies: Use white chocolate chips instead of regular chocolate chips and add dried cranberries for a festive touch.
S’mores Trash Cookies: Use crushed graham crackers instead of pretzels, add mini marshmallows and chocolate chips.
Gluten-Free Version: Substitute the all-purpose flour with a 1:1 gluten-free baking flour blend.
Storage and Make-Ahead Tips
Room Temperature Storage: Store cookies in an airtight container at room temperature for up to 5 days. Place parchment paper between layers if stacking.
Freezing Baked Cookies: Freeze baked cookies in an airtight container for up to 3 months. Thaw at room temperature before serving.
Freezing Cookie Dough: Scoop the dough into balls, freeze on a baking sheet until solid, then transfer to a freezer bag. Bake from frozen, adding 2-3 minutes to the baking time.
Make-Ahead Dough: The dough can be made up to 2 days ahead and stored in the refrigerator. Let it sit at room temperature for 15 minutes before scooping and baking.
Serving Suggestions
Enjoy the magic of Halloween through these delightful Halloween trash can cookies!
There’s nothing quite like a freshly baked Halloween trash can cookie!
After-School Snack: These cookies are perfect for hungry kids coming home from school.
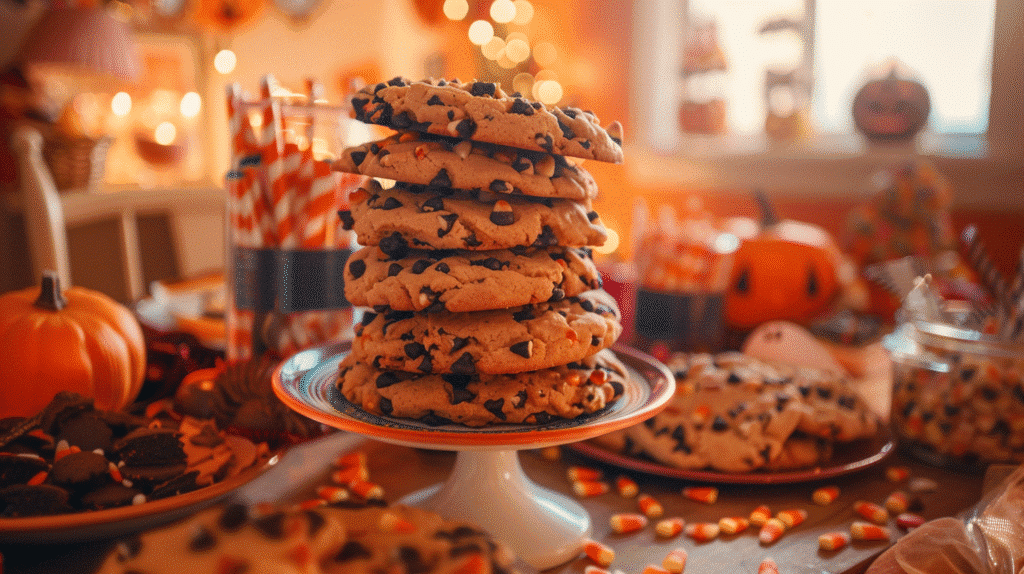
Halloween Party Treat: Serve them at Halloween parties alongside other spooky treats.
Bake Sale Star: These cookies always sell out first at bake sales because they look so impressive.
Impress your friends with your homemade Halloween trash can cookies!
Gift Giving: Package them in cellophane bags tied with orange and black ribbon for a festive homemade gift.
Enjoy the festive spirit with these Halloween trash can cookies!
These Halloween trash can cookies are a great way to enjoy your Halloween festivities!
Ice Cream Sandwiches: Use two cookies to sandwich your favorite ice cream for an over-the-top dessert.
Common Mistakes to Avoid
Using Too Many Mix-Ins: While it’s tempting to add everything, too many mix-ins can prevent the cookies from holding together. Stick to 2-3 cups total.
Not Chopping Candy Small Enough: Large chunks of candy can cause cookies to spread unevenly or fall apart. Aim for bite-sized pieces.
Overbaking: These cookies should be soft and chewy. Don’t wait for the centers to look completely done—they’ll finish cooking on the pan.
Skipping the Cooling Time: If you try to move the cookies too soon, they’ll fall apart. Let them cool on the pan for at least 5 minutes.
By following this easy recipe for Halloween Trash Can Cookies, you will impress your friends and family with your baking skills!
Frequently Asked Questions
What candies work best?
Chocolate-based candies like Snickers, Reese’s, Twix, and M&M’s are ideal. Chewy candies like caramels also work well. Avoid hard candies like lollipops or jawbreakers, as they don’t bake well.
Can I use only one type of candy?
You can, but the cookies are more interesting with a variety. That said, all-Reese’s or all-M&M’s cookies would still be delicious!
Can I make these without pretzels or chips?
Yes, but the salty element really makes these cookies special. If you don’t have pretzels or chips, try adding salted peanuts instead.
Why did my cookies spread too much?
This usually happens if your butter was too soft or melted, or if you didn’t chill the dough. Make sure your butter is softened but not greasy.
Can I freeze the dough?
Absolutely! Freeze scooped cookie dough balls and bake them straight from the freezer whenever you want fresh cookies.
How do I keep the cookies soft?
Store them in an airtight container with a piece of bread. The bread will release moisture that keeps the cookies soft.
Can I make these dairy-free?
Yes! Use dairy-free butter and make sure your candy choices are dairy-free (check labels, as many chocolate candies contain milk).
Transform leftover candy into delicious Halloween trash can cookies!
Nutritional Information
Celebrate by making a batch of Halloween trash can cookies for everyone to enjoy!
Per cookie (makes about 24 large cookies):
•Calories: 245
•Total Fat: 11g
Each bite of Halloween trash can cookies is a celebration of the holiday!
•Saturated Fat: 6g
Make sure to save some Halloween trash can cookies for your friends!
Share the joy of baking with Halloween trash can cookies this season!
•Cholesterol: 30mg
•Sodium: 150mg
•Total Carbohydrates: 35g
•Dietary Fiber: 1g
•Sugars: 24g
•Protein: 3g
The Ultimate Candy Solution
So get creative and have fun with your Halloween Trash Can Cookies! Who knows what delicious combinations you will come up with?
Happy baking, and enjoy your Halloween Trash Can Cookies with friends!
These Spooky Halloween Trash Can Cookies are proof that leftover candy doesn’t have to be boring. They’re fun to make, endlessly customizable, and absolutely delicious. The combination of a soft, buttery cookie base with crunchy, salty, sweet, and chocolatey mix-ins creates a treat that’s far greater than the sum of its parts.
Whether you’re a parent looking for a fun weekend baking project with the kids, a baker who loves experimenting with creative recipes, or simply someone with way too much Halloween candy, this recipe is for you. It transforms candy chaos into cookie perfection, and it does so in the most delicious way possible.
So gather up that leftover candy, preheat your oven, and get ready to make the most loaded, over-the-top, ridiculously delicious cookies you’ve ever tasted. Your inner mad scientist (and your taste buds) will thank you.
Additional Resources and Nutritional Information
For more information about the nutritional benefits and food safety of the ingredients in this recipe, the USDA FoodData Central provides comprehensive data on chocolate chips, showing their calorie content and nutritional profile. If you’re using candy in your baking, the FDA’s food allergen guidelines can help you identify potential allergens in commercial candies. For general information about sugar consumption and healthy eating, visit the CDC’s nutrition guidelines. When baking with children, always follow FDA food safety practices to ensure proper handling and storage. For dietary recommendations and portion guidance, the Dietary Guidelines for Americans offers evidence-based advice on balanced nutrition.
Estimated Nutrition (per cookie, 1 of 24 ):
- Calories: 180
- Protein: 2g
- Fat: 8g
- Carbohydrates: 26g
- Sugar: 16g
- Fiber: 1g
Happy Halloween baking!
More Fall Desserts You’ll Love
If you’re looking for more delicious fall treats, check out these recipes:
- Easy Pumpkin Spice Latte Cookies – Another fall cookie recipe that’s perfect for the season!
- Air Fryer Apple Cider Donuts – Warm, cozy donuts with apple cider flavor!
- The Best Pistachio Brownies – Rich, fudgy brownies for chocolate lovers!