
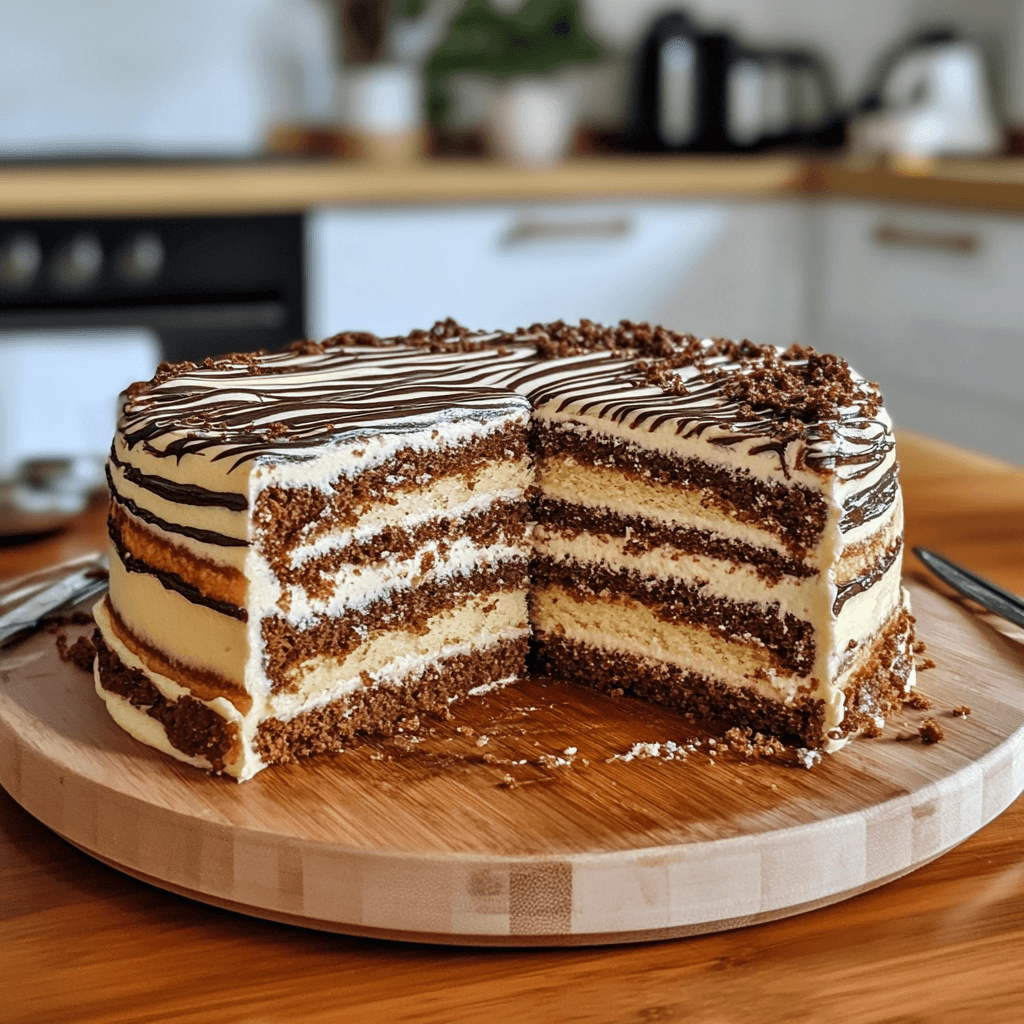
If you’ve ever cut into a cake and marveled at the perfect black-and-white stripes that look like they belong in the wild, you’ve likely seen (or tasted) a zebra cake. This delightful dessert isn’t just a visual treat—it’s also light, fluffy, and packed with a duo of rich chocolate and smooth vanilla flavors. The magic lies in the clever layering of two contrasting batters to create a striped interior that mimics the elegant patterns of a zebra.
Thank you for reading this post, don't forget to subscribe!
In this detailed guide, we’ll walk you through everything you need to know about zebra cake. From ingredients and baking techniques to popular variations and FAQs, this post is your go-to resource for mastering this eye-catching dessert. Don’t miss our Classic French Madeleines Recipe if you enjoy elegant baked goods.
Table of Contents
PART 1: What Is a Zebra Cake?
– The Origin and Concept of Zebra Cake
Zebra cake may look like something out of a bakery window, but its roots are pretty humble. This striped dessert is believed to have originated as a fun twist on traditional marble cake, with bakers wanting to create a more visually striking effect. By layering spoonfuls of vanilla and chocolate batter alternately in a round cake pan, the mixture forms concentric rings. Once sliced, these rings become stunning stripes that mimic the pattern of a zebra—hence the name.
While it shares visual cues with marble cake, zebra cake differs in technique. Marble cake involves swirling batters together, whereas zebra cake layers them precisely for cleaner, more defined stripes. This results in a much neater, graphic design that wows anyone who cuts into it.
Whether you’re baking for a birthday, holiday, or just because it’s the weekend, zebra cake stands out on the table. Its charm lies in the fact that it’s deceptively simple—no special decorating tools required.
– What Makes a Cake “Zebra”? Visual and Structural Elements
The iconic look of zebra cake is all about contrast. The batter is split into two equal parts—typically one flavored with vanilla and the other with cocoa powder or melted chocolate. The trick is to spoon alternating layers of each into the center of your pan without mixing them. Over time, the layers push outward, creating a natural striped pattern that’s both structured and random.
Here’s a quick visual comparison:
| Feature | Zebra Cake | Marble Cake |
|---|---|---|
| Technique | Layering spoonfuls of batter | Swirling two batters together |
| Final Look | Neat, symmetrical stripes | Swirled, abstract patterns |
| Flavor Distribution | Uniform layered flavor | Mixed flavors in every bite |
| Texture | Light and airy | Denser and more mixed |
Zebra cake is usually round, but bakers love to get creative with loaf pans, bundt molds, and even cupcake trays. You can also tint your vanilla batter with food coloring for rainbow stripes, making this recipe perfect for kids’ parties.
If you’re a fan of aesthetically pleasing treats, you might also love our Pumpkin French Toast Casserole—another Instagram-worthy creation.
PART 2: Key Ingredients in a Zebra Cake Recipe
– Essential Ingredients You’ll Need
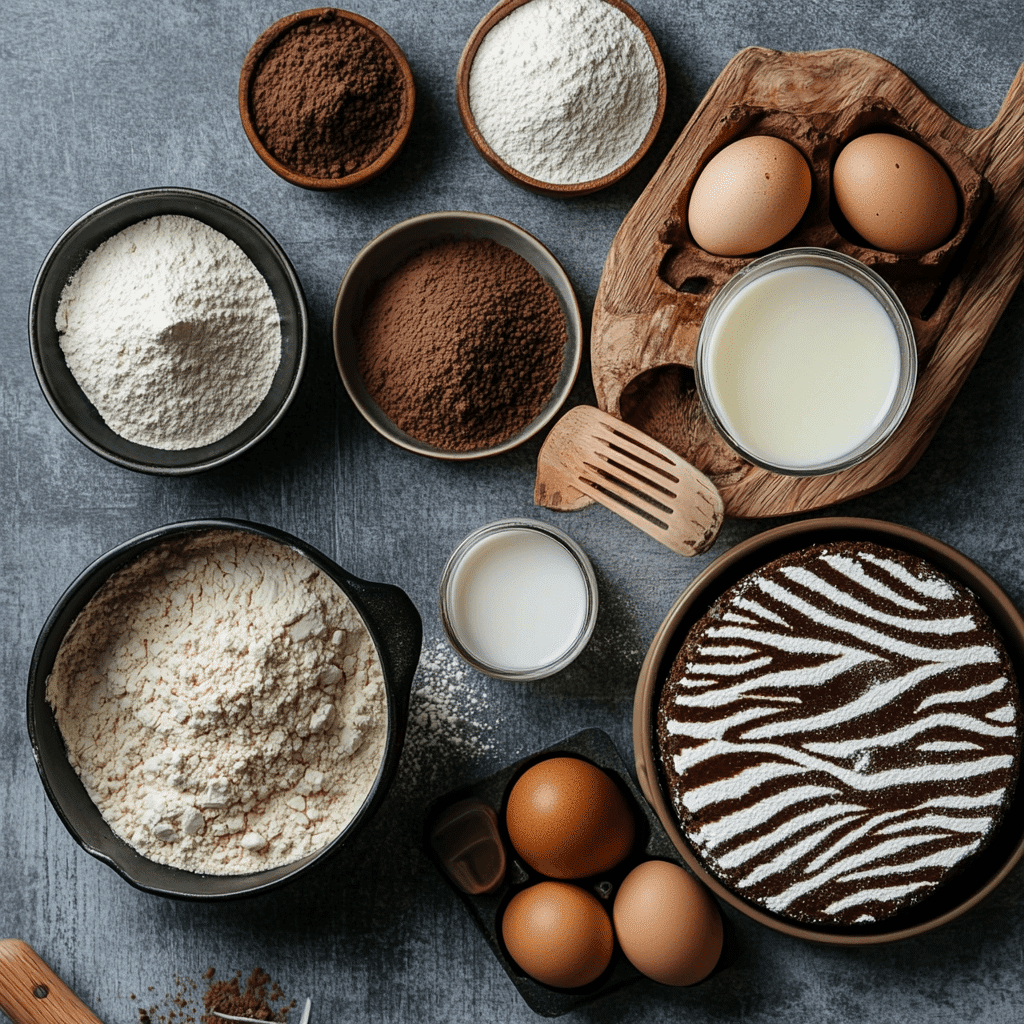
To create a beautifully layered and delicious zebra cake, it all starts with the right ingredients. This cake isn’t complicated, but using the right balance of wet and dry ingredients ensures your batter flows smoothly, creating those signature stripes.
Here’s a list of classic ingredients used in a traditional zebra cake recipe:
| Ingredient | Purpose |
|---|---|
| All-Purpose Flour | Provides the structure and body of the cake |
| Granulated Sugar | Adds sweetness and balances the cocoa |
| Eggs | Bind the batter and contribute to the fluffy texture |
| Vegetable Oil or Melted Butter | Keeps the cake moist and soft |
| Milk | Helps the batter achieve the right consistency |
| Vanilla Extract | Adds depth and aroma to the vanilla batter |
| Cocoa Powder | Infuses the chocolate layer with rich, dark flavor |
| Baking Powder | Gives the cake lift and airiness |
| Salt | Balances the sweetness and enhances flavor |
A few optional add-ins:
- Greek yogurt or sour cream – for extra moisture and a slight tang.
- Espresso powder – enhances the chocolate taste without making it taste like coffee.
These everyday kitchen staples come together to create a cake that’s both beautiful and satisfying. If you’re into decadent cookies, don’t miss our Peanut Butter Chocolate Chip Cookies—another classic made with pantry basics.
– Best Substitutes for Dairy or Gluten-Free Options
Love the look of zebra cake but have dietary restrictions? No problem. You can still enjoy this striped dessert by making a few smart swaps:
Gluten-Free Zebra Cake
- Replace regular flour with a 1:1 gluten-free all-purpose blend. Ensure it includes xanthan gum for proper binding.
- Sift the flour well to avoid lumps and help the batters layer smoothly.
Dairy-Free Zebra Cake
- Use almond milk, soy milk, or oat milk in place of regular milk.
- Swap butter with coconut oil or a dairy-free margarine.
- For extra richness, add a tablespoon of unsweetened applesauce or vegan yogurt.
Egg-Free Zebra Cake
- Substitute each egg with:
- 1 tbsp ground flaxseed + 3 tbsp water (let it sit for 5 mins), or
- ¼ cup unsweetened applesauce, or
- 1 mashed ripe banana (adds subtle flavor)
These swaps not only keep the texture intact but also preserve that lovely visual appeal that makes zebra cake so special. Looking for another allergy-friendly dessert? Our Crispy Air Fryer Apple Fries are naturally gluten-free and perfect for snacking.
With your ingredients sorted, you’re ready to move to the real fun—layering and baking!
PART 3: How to Make Zebra Cake from Scratch
– Step-by-Step Instructions with Layering Tips
Now that you’ve gathered your ingredients, it’s time to bring your zebra cake to life. This recipe is all about precision and patience, especially when it comes to layering the batter to get that stunning striped effect.
Here’s how to do it:
Ingredients (Base Recipe)
- 2 cups all-purpose flour
- 1 cup granulated sugar
- 1 tbsp baking powder
- ½ tsp salt
- 4 large eggs
- ¾ cup vegetable oil
- 1 cup whole milk (or dairy-free alternative)
- 2 tsp vanilla extract
- ¼ cup unsweetened cocoa powder
Directions
1. Preheat and Prepare
Preheat your oven to 350°F (175°C). Grease a 9-inch round cake pan and line the bottom with parchment paper.
2. Mix the Dry Ingredients
In a large bowl, whisk together flour, baking powder, and salt.
3. Combine Wet Ingredients
In another bowl, beat eggs and sugar until light and fluffy. Slowly whisk in milk, oil, and vanilla extract.
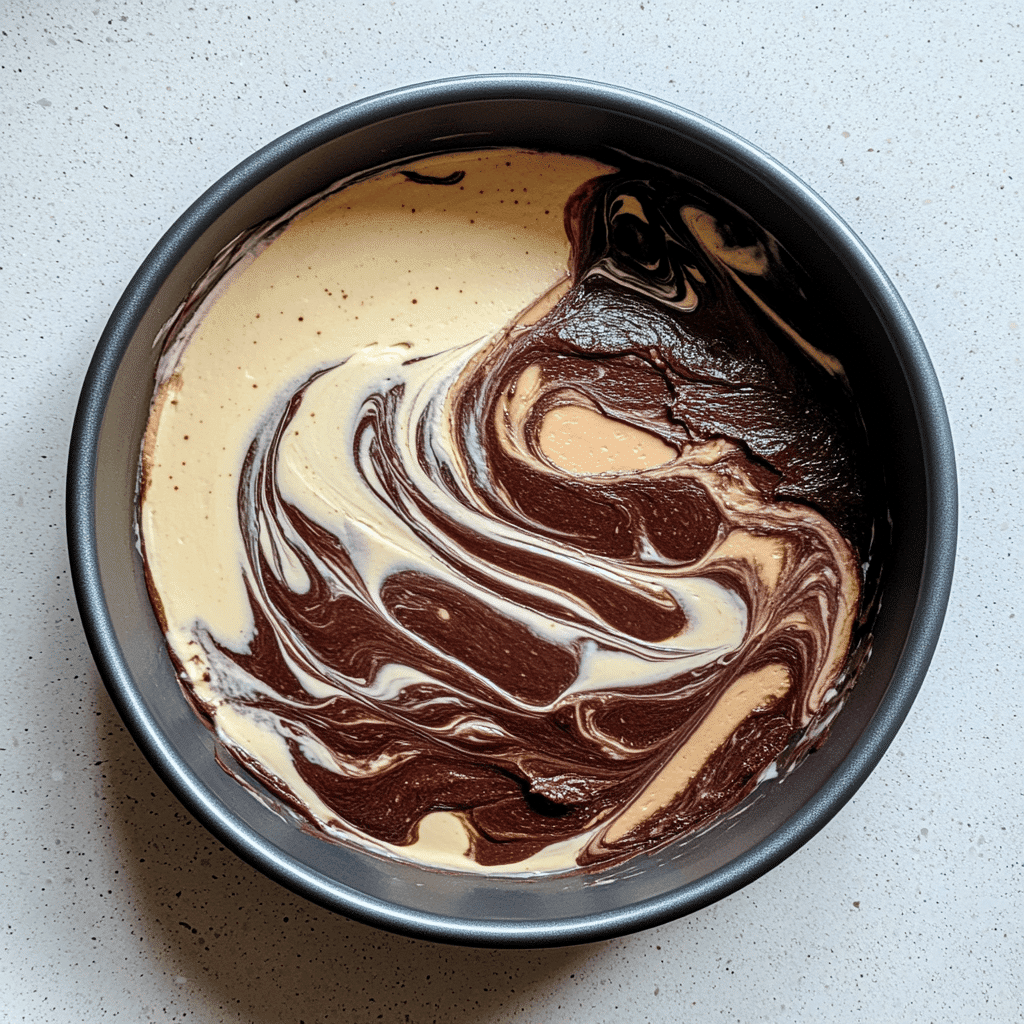
4. Make Two Batters
Gradually add the dry mixture into the wet bowl. Stir until just combined.
Now, split the batter in half:
- Leave one half plain (vanilla).
- Add cocoa powder to the other half and stir until smooth (chocolate).
5. Layer the Batter
This is the key step in creating the zebra stripes:
- Scoop 3 tablespoons of vanilla batter into the center of the pan.
- Then, add 3 tablespoons of chocolate batter right on top of it.
- Continue alternating spoonfuls of each batter, one on top of the other, always in the center.
The batter will slowly spread outward in rings as you build the pattern.
6. Bake
Place in the oven and bake for 40–45 minutes, or until a toothpick inserted into the center comes out clean.
7. Cool and Release
Let the cake cool in the pan for 10 minutes, then turn it out onto a wire rack to cool completely before slicing.
Looking for baking inspiration while your cake cools? Don’t miss our decadent Dark Chocolate Pecan Cookies for your next sweet craving.
– Tools and Equipment That Make It Easier
You don’t need professional tools to make zebra cake, but a few basics can simplify the process:
| Tool | Purpose |
|---|---|
| Mixing bowls (2) | One for vanilla, one for chocolate batter |
| 9-inch round cake pan | Ensures even layering |
| Measuring cups/spoons | Precision is important for balance |
| Silicone spatula | Helps scrape every last drop of batter |
| Ice cream scoop or ladle | Keeps layering sizes consistent |
| Toothpick or cake tester | Check doneness without disturbing the layers |
Pro Tip: Use an offset spatula to gently spread batter if it piles up in one spot. Don’t swirl—just tap the pan lightly to settle it.
PART 4: Baking Techniques for Perfect Layers
– How to Get That Perfect Zebra Pattern
Getting those flawless, defined stripes in your zebra cake doesn’t happen by accident—it’s all about the right technique. The good news? You don’t need any fancy skills. Just follow these simple rules to master the look:
1. Always Use Equal Amounts of Batter
Consistency is key. Use the same scoop size for each layer. Whether it’s 2 tablespoons or ¼ cup, just stick with it from beginning to end. This ensures even rings and symmetry.
2. Center Drop, No Spreading
Each spoonful of batter should be poured directly into the center of the cake pan. Don’t tilt or spread it with a spoon. The batter will naturally push outward as more layers are added, creating that signature ripple effect.
3. Use Fluid Batter
A thick batter won’t spread correctly. If your batter feels too stiff, add a tablespoon of milk to each bowl until it’s smooth but not runny. This makes layering effortless and prevents distortion.
4. Tap the Pan
Once all the batter is layered, gently tap the cake pan on the counter to release any air bubbles and help the batter settle. This step also improves the definition of each stripe.
5. Avoid Overmixing
Overmixing your batter after adding flour can make the cake dense and affect how it spreads in layers. Stop mixing once everything is combined.
Here’s a quick reminder chart:
| Step | Why It Matters |
|---|---|
| Equal scoops | Even stripes |
| Center pouring | Natural ring formation |
| Thin batter | Better flow and layering |
| Tap the pan | Smooth surface, fewer bubbles |
For more desserts with visual flair, check out our Pumpkin French Toast Casserole, which is as pretty as it is tasty.
– Temperature, Timing, and Baking Troubleshooting
Even if you’ve nailed the layering, your cake needs the right baking environment to hold those stripes. Here’s what to keep in mind:
Optimal Baking Conditions:
- Temperature: 350°F (175°C) is ideal for an even rise.
- Rack Position: Always bake on the middle rack for balanced heat distribution.
- Baking Time: 40–45 minutes, but check at 38 minutes with a toothpick.
Troubleshooting Common Problems:
| Problem | Cause | Fix |
|---|---|---|
| Layers blend together | Batter too runny or poured too fast | Use slightly thicker batter and alternate slowly |
| Uneven layers | Inconsistent scoop sizes | Use the same measuring spoon or cup |
| Cake cracks on top | Oven too hot or overbaked | Lower temp slightly and don’t overmix batter |
| Dense or rubbery texture | Overmixed batter or old baking powder | Mix gently and use fresh leavening agents |
Pro Tip: If you’re using a dark or nonstick pan, reduce the oven temp to 325°F to avoid over-browning.
For more cozy treats you can make with zero stress, try our Easy Chicken and Gravy—a savory comfort food that’s a breeze to prepare.
PART 5: Variations of the Zebra Cake Recipe
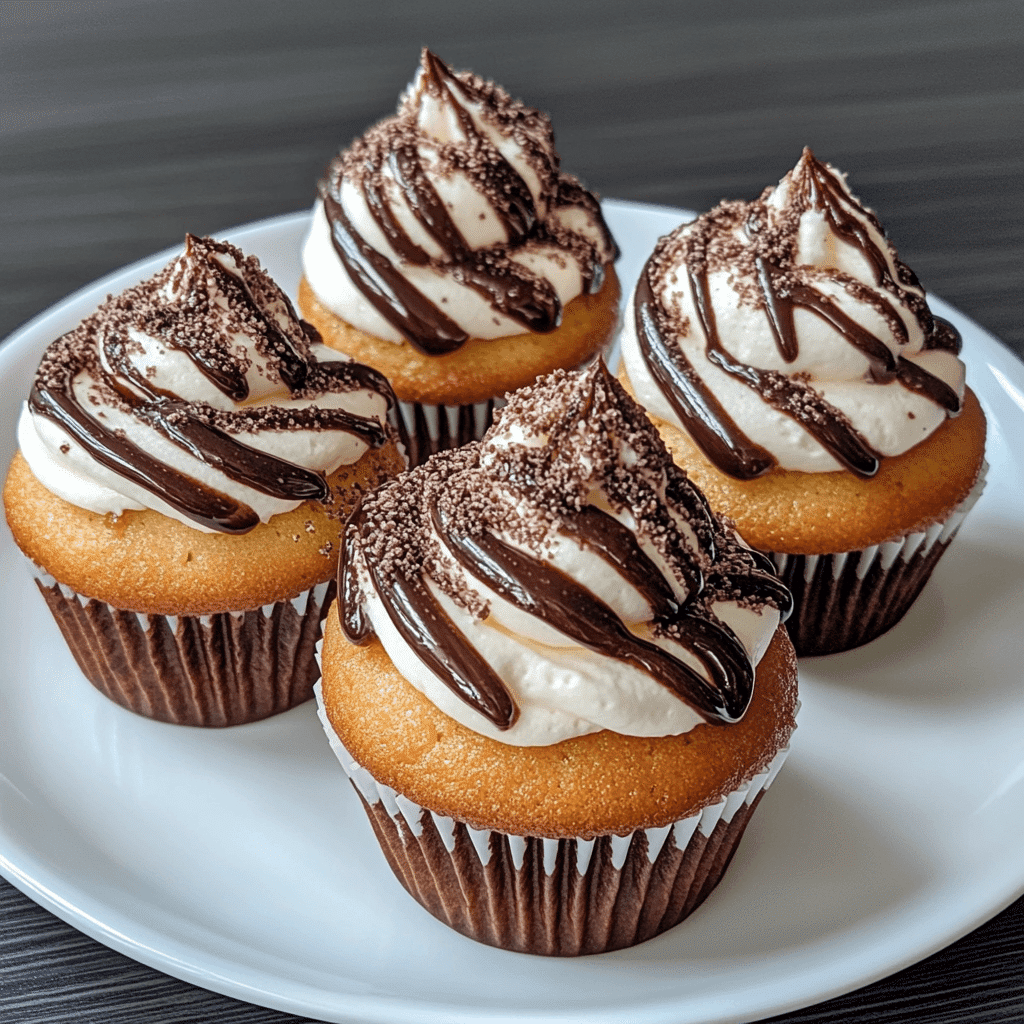
– Mini Zebra Cakes and Cupcakes
One of the best things about zebra cake is how adaptable it is. You don’t have to stick with the classic round cake format—mini versions are just as charming and ideal for individual servings, birthday parties, or bake sales.
Zebra Cupcakes
Cupcakes are a fun and convenient way to serve zebra cake. Here’s how to convert the standard recipe:
- Use a muffin tin lined with paper cups.
- Alternate 1 tablespoon of each batter directly into each cup.
- Bake at 350°F for 18–22 minutes, or until a toothpick comes out clean.
These mini zebra cakes look gorgeous when you peel back the liner, revealing the stripe pattern inside. You can top them with whipped cream or a swirl of chocolate ganache for a bakery-style touch.
Zebra Cake Sandwiches
Another playful idea is turning zebra cake slices into sandwiches:
- Bake your zebra cake in a loaf pan.
- Slice it thinly once cooled.
- Spread a filling like vanilla buttercream, Nutella, or cream cheese frosting between two slices.
Looking for a simple cookie-based dessert for variety? Discover great ideas like our Peanut Butter Chocolate Chip Cookies.
– Chocolate, Vanilla, Strawberry, and Funfetti Swirls
If you’re ready to go beyond the classic chocolate and vanilla combo, zebra cake is the perfect base for flavor experimentation.
Chocolate & Strawberry Zebra Cake
Add 2 tablespoons of strawberry puree or freeze-dried strawberry powder to the vanilla batter. It not only adds flavor but also gives a light pink hue, making the cake extra fun for themed parties.
Funfetti Zebra Cake
Fold in colorful sprinkles to one half of the batter (usually the vanilla side). When baked, you’ll get striped layers with pops of color that are ideal for celebrations.
Triple-Flavored Zebra Cake
Feeling bold? Try layering three flavors:
- Vanilla
- Chocolate
- Strawberry or matcha
Rotate each flavor scoop into the center in a repeating sequence for multicolored, multi-flavored layers. Kids and adults alike will be amazed.
Vegan or Keto Variations
Use almond flour, coconut oil, and plant-based milk to adapt zebra cake to fit low-carb or vegan diets. You’ll still get beautiful stripes with a few small adjustments.
Check out our Crispy Air Fryer Apple Fries for another light yet indulgent dessert idea that aligns with cleaner eating.
PART 6: Is Zebra Cake the Same as Marble Cake?
– Key Differences in Texture, Look, and Taste
At first glance, zebra cake and marble cake may seem similar. Both feature two-toned batters—usually vanilla and chocolate—and both offer a swirl of flavor in every bite. But look a little closer, and you’ll find that they’re quite different in technique, texture, and presentation.
Here’s a side-by-side comparison:
| Feature | Zebra Cake | Marble Cake |
|---|---|---|
| Appearance | Neat, concentric stripes like a zebra | Swirled or marbled effect |
| Mixing Technique | Batter is layered spoon-by-spoon | Batters are swirled together |
| Flavor Distribution | Flavors alternate evenly in layers | Mixed throughout with no pattern |
| Texture | Light, spongy, often more uniform | Slightly denser due to mixing |
| Presentation | Visually dramatic when sliced | Rustic and artistic swirl patterns |
Zebra cake is about precision—layering one batter on top of the other in the center of the pan to create a symmetrical striped effect. It’s a showstopper when sliced, thanks to the sharp contrast between the black and white layers.
Marble cake, on the other hand, is more casual. The two batters are swirled together with a knife or skewer to create a flowing, marbled pattern. The result is just as delicious but less structured.
– When to Choose One Over the Other
Wondering when to go with a zebra cake and when to opt for a marble cake? It really comes down to occasion and visual impact.
Choose Zebra Cake When:
- You want a cake that visually impresses without needing decoration.
- Presentation is key (like birthdays or photo-worthy events).
- You’re aiming for evenly distributed flavors and textures.
Choose Marble Cake When:
- You’re short on time and want something a bit more rustic.
- You prefer stronger chocolate or vanilla flavor pockets.
- You want a denser texture for layered or loaf cakes.
If your goal is elegance without a lot of effort, zebra cake wins. And if you’re feeling creative, you can even combine both methods: start with zebra-style layering, then swirl the top gently before baking for a hybrid effect.
Don’t miss our Dark Chocolate Pecan Cookies for another classic dessert with a twist of indulgence.
PART 7: The Perfect Zebra Cake Filling and Frosting
– What’s Inside? Common Fillings for Zebra Cakes
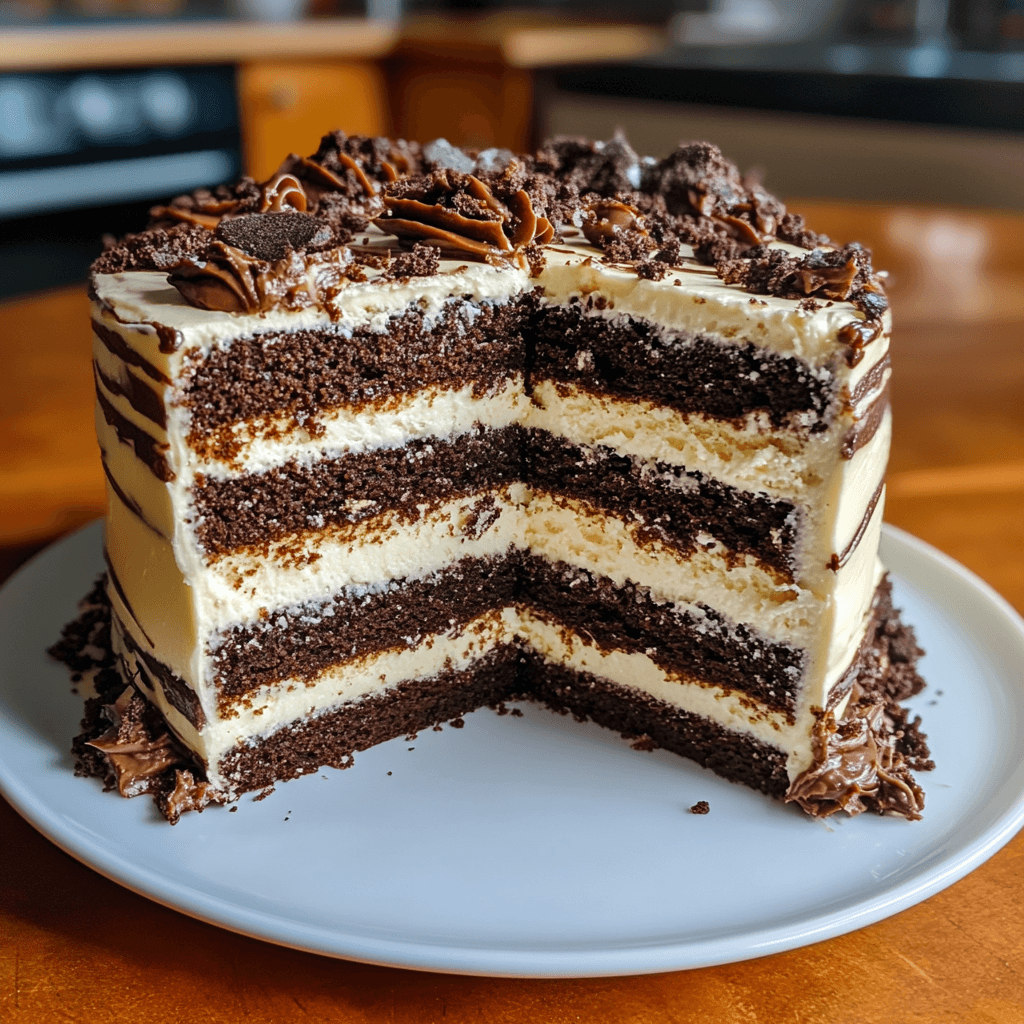
While zebra cake looks stunning on its own, adding a filling can transform it into a bakery-quality dessert. A layered zebra cake with a creamy center not only boosts flavor but adds texture contrast to the light sponge.
Here are some of the best fillings that complement the classic chocolate-vanilla zebra pattern:
1. Vanilla Buttercream
Classic, creamy, and crowd-pleasing. Vanilla buttercream pairs beautifully with the dual flavors of zebra cake and enhances the light texture without overpowering it.
2. Chocolate Ganache
Want a richer bite? Add a smooth layer of dark or milk chocolate ganache between cake layers. It melts into the crumb for a luxurious mouthfeel.
3. Whipped Cream and Berries
Fresh whipped cream, lightly sweetened and mixed with strawberries or raspberries, adds a light and fruity twist—perfect for summer gatherings or tea parties.
4. Cream Cheese Filling
Tart and creamy, this filling works especially well if you’ve made a slightly sweeter version of zebra cake. It balances out the sugar while adding a decadent touch.
5. Nutella or Chocolate Hazelnut Spread
A favorite among kids and adults alike. It adds a nutty depth and enhances the chocolate flavor of the cake.
You can even split the cake horizontally and add one or two thin layers of filling to create a “layer cake” effect.
Looking for more layered indulgence? Discover great ideas like our Pumpkin French Toast Casserole—a dish that’s all about soft, satisfying textures.
– Best Frosting and Topping Ideas
Once filled, zebra cake begs for a glossy finish. Here are the best frostings to complement its flavor and elevate its look:
Chocolate Glaze
Melt together dark chocolate and cream, then pour it over the top of the cake for a smooth, shiny finish. This creates a beautiful contrast with the striped interior once sliced.
Vanilla or Cream Cheese Frosting
A simple vanilla frosting keeps things light and lets the inside shine. Cream cheese adds a little tang that pairs perfectly with the cocoa flavor.
Dusting of Powdered Sugar
For a minimalist approach, simply dust powdered sugar over the top. It’s subtle and won’t hide the natural beauty of the cake.
Fresh Fruit or Chocolate Shavings
Garnish with fresh berries or curled chocolate on top for color and flair—especially great for holiday tables or birthdays.
| Frosting | Flavor Profile | Occasion |
|---|---|---|
| Chocolate Ganache | Rich & bold | Dinner parties |
| Whipped Cream | Light & airy | Summer brunch |
| Cream Cheese | Tangy & smooth | Holidays |
| Powdered Sugar | Classic & simple | Everyday dessert |
For a fun twist, you can even create a layered zebra cake stack, frosting each layer and letting the stripes peek through the sides. If you enjoy texture-rich recipes, don’t miss our Easy Chicken and Gravy—a savory complement to your sweet creations.
PART 8: Serving, Storing, and Reheating Zebra Cake
– How to Cut and Serve Zebra Cake Perfectly
You’ve baked your beautiful zebra cake, and now comes the moment of truth—the slice reveal. Cutting and serving it the right way ensures those striped layers shine and hold their shape.
Tips for Picture-Perfect Slices:
- Let It Cool Completely
Warm cake is more likely to crumble or smudge. Wait until your zebra cake is fully cooled before slicing. - Use a Sharp Knife
A long, thin, serrated knife works best. Wipe the blade clean between slices to avoid smearing the colors. - Cut Straight Down
Slice straight down instead of sawing back and forth. This helps preserve the stripe pattern and keeps the layers neat. - Serve with a Visual Touch
Zebra cake looks beautiful on its own, but you can elevate the presentation with:- A dollop of whipped cream on the side
- A few fresh berries
- A drizzle of chocolate or berry sauce on the plate
If you like simple but elegant desserts, don’t miss our Classic French Madeleines—another visual delight perfect for guests.
– Storage Methods to Keep It Fresh Longer
To keep your zebra cake moist and flavorful, it’s important to store it the right way—especially if you plan to enjoy it over a few days.
Short-Term Storage (1–3 Days)
- Room Temperature: Keep the cake in an airtight container at room temp if it’s unfrosted or topped with buttercream.
- Avoid Direct Sunlight: Exposure to heat can cause the frosting to melt and the cake to dry out.
Long-Term Storage (Up to 1 Week)
- Refrigerate: If your cake has cream cheese, whipped cream, or fruit fillings, store it in the fridge.
- Wrap it tightly in plastic wrap or place it in a covered cake container.
- Let it come to room temp before serving to bring back the soft texture.
Freezing Instructions
- Freezing Slices: Wrap individual slices in plastic wrap, then in foil. Store in an airtight container or freezer bag.
- Freezing the Whole Cake: Chill the cake first, then wrap it well. Freeze for up to 2 months.
To thaw: Place in the fridge overnight or on the counter for 2–3 hours.
– How to Reheat Zebra Cake
While zebra cake is best enjoyed fresh, reheating it can bring back that soft, just-baked texture—especially if it’s been chilled or frozen.
Reheating Tips:
| Method | Time | Best For |
|---|---|---|
| Microwave | 10–15 seconds per slice | Quick softening |
| Oven | 300°F for 8–10 minutes | Reheating several slices |
| Toaster Oven | 5–7 minutes | Crisping the edges slightly |
Avoid overheating or you’ll dry it out. Add a small cup of water inside the microwave to keep moisture in.
Pro Tip: Lightly brush each slice with milk before reheating in the oven for extra softness.
PART 9: Nutritional Value and Dietary Tips
– Calories and Macros per Serving
Zebra cake may look light and airy, but like most desserts, it comes with a sweet dose of calories. Here’s a breakdown of the average nutritional values for one standard slice (1/10 of a 9-inch cake) without frosting or filling:
| Nutrient | Approximate Value |
|---|---|
| Calories | 240–280 kcal |
| Total Fat | 12–14g |
| Saturated Fat | 3–4g |
| Carbohydrates | 30–34g |
| Sugars | 18–22g |
| Protein | 3–5g |
| Fiber | 1g |
| Sodium | 150–180mg |
These values can change based on your ingredients and any frosting or filling you use. A ganache or cream cheese frosting will push the calorie count higher, while a simple powdered sugar dusting keeps it lighter.
Want a rich dessert with a slightly better nutritional profile? Try our Dark Chocolate Pecan Cookies—a satisfying treat that blends indulgence and crunch.
– How to Make a Healthier Zebra Cake
If you’re looking to lighten up your zebra cake without losing the flavor or texture, here are some simple swaps and adjustments:
1. Reduce the Sugar
Cut the sugar by ¼ cup for a slightly less sweet cake. The chocolate and vanilla still shine through, especially if paired with fresh fruit or lightly sweetened whipped cream.
2. Swap the Oil
Replace half (or all) of the oil with:
- Unsweetened applesauce
- Mashed banana
- Greek yogurt
These keep the cake moist while lowering fat and adding nutrients.
3. Use Whole Wheat or Almond Flour
Substitute up to 50% of all-purpose flour with whole wheat or almond flour to add fiber and protein.
4. Go Dairy-Free
Use plant-based milk (like oat or almond milk) and dairy-free margarine or coconut oil for a lactose-free version.
5. Add Extra Protein
Mix a tablespoon of chia seeds or a scoop of unflavored protein powder into the vanilla batter. It won’t affect taste but will boost your macros.
These changes make zebra cake a better fit for those watching their sugar or fat intake, or just wanting a more nourishing option without sacrificing the beautiful stripes.
Looking for inspiration? Try Crispy Air Fryer Apple Fries—another fun treat that can be made with minimal sugar and oil.
FAQ: Zebra Cake Questions Answered
– What are zebra cakes made of?
Zebra cakes are typically made from a basic cake batter split into two flavors: vanilla and chocolate. The ingredients include flour, sugar, eggs, vegetable oil or butter, milk, baking powder, salt, and vanilla extract. Cocoa powder is added to one portion of the batter to create the chocolate layer. The magic comes from alternating spoonfuls of each batter in a pan to form a zebra-like stripe pattern when sliced.
– What is the filling in zebra cake?
Zebra cake doesn’t always include a filling, but when it does, common options include vanilla buttercream, cream cheese frosting, or chocolate ganache. Some homemade versions may use whipped cream or fruity layers like raspberry jam. The filling can be added between two thin cake layers or inside a roll version of zebra cake, adding richness and moisture to the final dessert.
– Is zebra cake the same as marble cake?
Not quite. While both zebra cake and marble cake use two batters (usually chocolate and vanilla), their techniques and looks are different. Zebra cake is layered in spoonfuls to create neat, concentric stripes, while marble cake is swirled together to form a more abstract pattern. Zebra cake is more structured in design, while marble cake has a casual, mixed appearance.
– What is the flavor of zebra cake?
The flavor of zebra cake is a classic blend of vanilla and chocolate, offering a light, moist texture with balanced sweetness. Depending on the recipe, it can lean more toward one flavor or stay perfectly balanced between the two. Some versions include additions like fruit, espresso, or almond extract to enhance the overall flavor.
Conclusion: Why Zebra Cake Should Be Your Next Baking Adventure
Zebra cake is more than just a dessert—it’s a celebration of flavor, creativity, and fun in the kitchen. With its hypnotic stripes, soft texture, and delightful blend of chocolate and vanilla, it’s a crowd-pleaser that looks far more complicated than it really is. Whether you’re baking for a party, a special family meal, or just trying something new, this striped beauty delivers on both looks and taste.
With the tips, techniques, and variations covered in this guide, you’re now ready to bake a zebra cake that not only tastes amazing but also turns heads. And if you want to keep the sweet vibes going, don’t miss our Classic French Madeleines Recipe for another refined yet simple treat.